👉 Click here to read the English version
 |
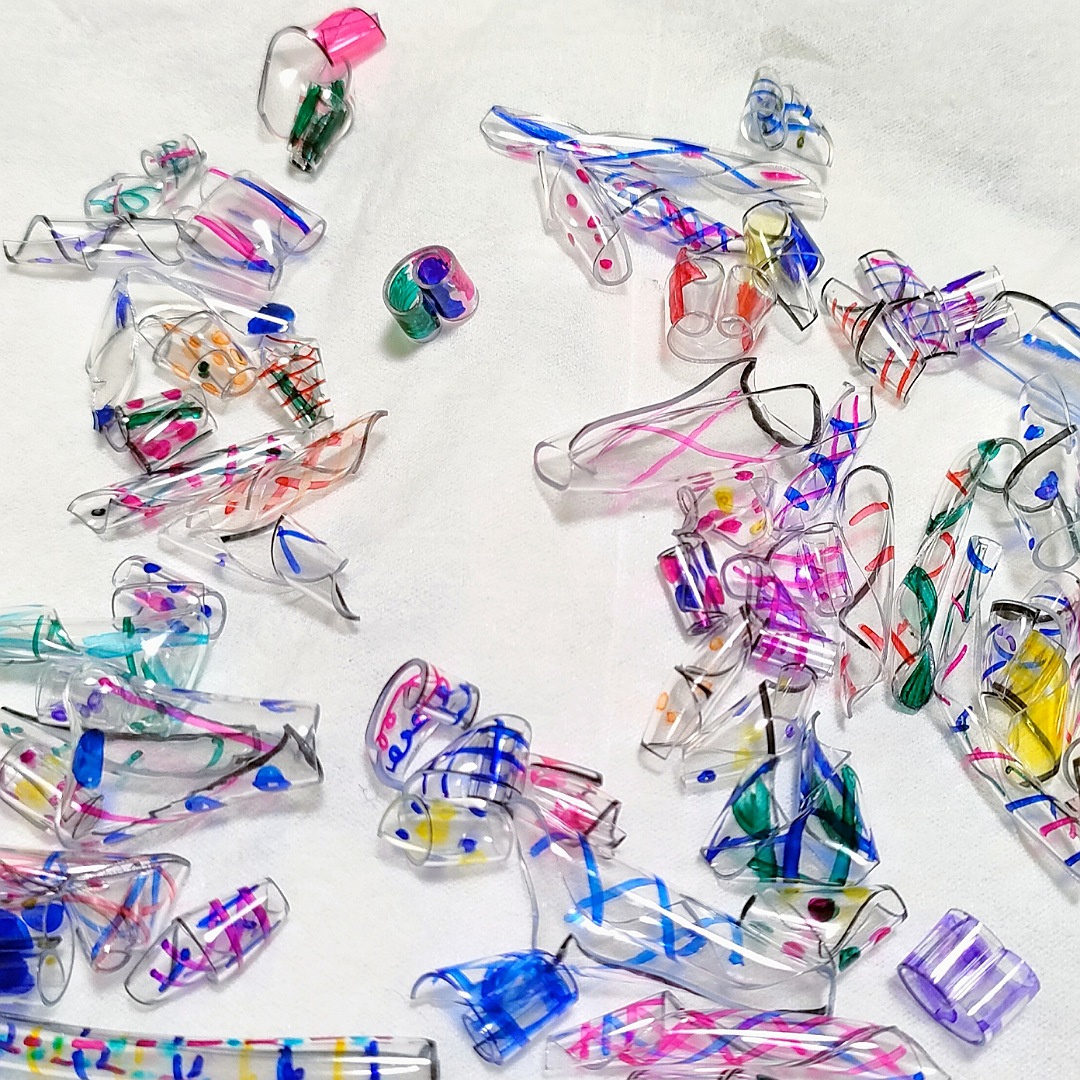
| ペットボトル 工作 ビーズ サンキャッチャー |
(こちらには個性が光る子達を採用しています
次のブログで説明いたします)
・夏に突入する前にキラキラなもの
・涼しそうなのが欲しい
との理由で、
ペットボトルビーズのサンキャッチャー作りを
挑戦してみました♪
なんだけど・・・
私が不器用なのか?
オーブンが悪いのか?
はたまたペットボトルが悪いのか?
失敗の連続で(笑)
他の方のブログを見たりしても真似しても上手くいきませんでした(*´ω`*)
だから、私は独自でちょっと調査してみました
ホンマに私、たくさん作ってみた_( _´ω`)_ペショ
 |
| 失敗 ペットボトル ビーズ なぜ? |
ことごとく丸くならない(笑)
とりあえず言える事は、サイトなどで作り方を
載せてなかったり説明があやふやだったりするのは
信ぴょう性にかけると思って良いと断言します
それか説明不足だと思います
でもね、いっぱい作ったら勉強になりました
「こうしたら、もっと綺麗にできるんか♪」とか、
「あ、これは失敗やな…」っていう、
「コツ」みたいなのがわかった
今日は、「何で綺麗に丸まらないん?」みたいに
悩んでいる人に失敗から学ぼうって思って貰う形で
書きますね
少しでも参考になれば幸いです☆
準備するのもの


綺麗に丸くなる率があがります


Sky dolphin-M- が見つけた!
ペットボトルビーズ「成功のコツ」5選✨
たくさん作ってみてわかった、綺麗に、
そして上手に丸くするコツはこれ!
デザインは「左右対称」を意識することです!
これは、すごく大事なポイントです(^^♪
切った所に絵を描く時、左右対称のデザインだと、
焼いた時にすっごく綺麗な丸になります。
 |
| ペットボトル ビーズ |
 |
| ペットボトル ビーズ 成功と失敗 |
・一番左のはバランスが悪くて失敗しました
・薄い色だとハートみたいに両端から丸くなってしまいます
・角を丸く切ると失敗しにくいです
* 個人的に思うベストサイズは
「横幅1cm × 長さ3cm」
色々な大きさを試した結果、私の
おすすめはこれ!
* 横幅が1センチ、縦の長さが3センチに
切ったものが、一番ぷっくりと可愛らしい、
綺麗な丸のビーズになってくれました(^^)/
* 横幅が1センチで、縦の長さが4センチでも、
ちゃんと丸く縮んでくれたから、
少し長めの形にしたい時は試してみてください。
ハサミで切り出す時は、この黒い枠線は残さずに
線の上、または線の内側をぴったり切るのが
ポイントで、黒い枠が残っていると、
焼いた時にその部分だけが目立って仕上がりが
ちょっとイマイチになります☆
なのでデザイン以外は切ってください
* 「シンプルなデザイン」が一番綺麗に焼ける!
とある所で切って適当に絵を描いたら
出来上がるって読んで試したけど・・・・
実はシンプルなデザインの方が、焼いた時に色が
くっきり出て、すごく綺麗に仕上がります
色がごちゃごちゃしすぎると、焼けて縮んだ時に
色が潰れてしまったり、イメージと違う
仕上がりになることがあった
まずは、線や点など、簡単で均等な模様から
始めてみるのがおすすめ!
ぐちゃぐちゃにした
アルミホイルの上に
描いたのを乗せて
オーブントースターで焼きます
170〜180℃で約1分~1分30秒が目安です。
ただし、機種によっては焦げたりするので
30秒ずつ様子見が安全。
ぷくっと丸くなった瞬間が焼き上がりサイン!
失敗しちゃったのはなぜ?
「うまくいかない理由」を解説!
なんで綺麗に焼けないんだろう?って思った時、
もしかしたらこんな理由があったのかもしれません。
* 左右非対称なデザインだと
ねじれるのはなぜ?
これは、ペットボトルが熱で縮む時に、
均等に力がかからないからです。
左右のバランスが悪いと、縮む力が偏ってしまって、
綺麗な丸にならずに、引っ張られる方向に
ねじれてしまうみたいです
* 黒い枠線が残ると目立つのはなぜ?
油性ペンで描いた線は、焼けて縮む時に色が
濃縮されるから、線が残っていると、
その部分だけが強く浮き出て見えたり、
線が太く見えすぎたりします
* 複雑なデザインが綺麗に焼けないのはなぜ?
これも色が濃縮されるのが理由の一つ
複雑な色や細かい絵は、
縮む時に色が混ざり合ってしまったり、
線と線がくっついて、
ぼやけた印象になる事がありました
なので、シンプルなデザインの方が、
色がくっきり出て、思っていた通りの仕上がりに
なることが多いです
どうでした?
私もたくさん失敗しながら、
このコツを見つけました(笑)
みんなも、このコツを参考にしながら、
自分だけの素敵なペットボトルビーズを
作ってみてくださいね(^^♪♪
次は、このビーズを使った
サンキャッチャーの作り方も紹介します(*'ω'*)
今から書くんで気になった方は投稿をお待ちください☆
English Is Here
 |
| bottle-beads-style-sun_catcher |
(This post features some of the most unique and
creative pieces I made.
I’ll explain more about them in the next post.)
・Before diving into summer,
I wanted something sparkly
・And something that looks refreshing
That’s why I decided to try making
PET bottle beads sun catchers♪
But honestly…
Was it just me being clumsy?
Or maybe my oven wasn’t cooperating?
Or… was it the PET bottles themselves??
I kept failing again and again (lol)
Even when I followed other people’s blogs
and tried to mimic their process,
it never worked out for me (´ω`)
So, I decided to run a little experiment of my own.
I really did make a LOT of these _( _´ω`)_
 |
| bottle-beads-style-fault |
None of them would turn out nice and round (lol)
One thing I can say for sure:
If a tutorial site doesn’t clearly explain the process,
or skips important steps…
you can assume it’s either unreliable or just lacking in detail.
Still, by making so many,
I started to learn a lot.
Like,
“Oh! This makes it rounder and prettier!”
or
“Yep, this one’s a fail…”
I got a feel for the tricks behind it.
So today, I’m writing this post to encourage anyone
who’s wondering, “Why aren’t mine turning out round?”
Learn from my mistakes—let’s grow together✨
I hope it helps, even just a little☆
What you’ll need:

・PET bottles ( Carbonated drink bottles are recommended.)
・Scissors
・Cutter knife (if available, super handy)
・Cutting board (with gridlines is even better)
・Pen
・Ruler (helps make clean cuts)
・Crumpled aluminum foil
(to prevent sticking)
・Oven
First, cut along the lines marked by the arrows,
both top and bottom.
A cutter works great here.

“Use this part”□
Use the part where the label was attached♪
If you look closely, you’ll see where the bottle
was joined together. That’s where you cut.
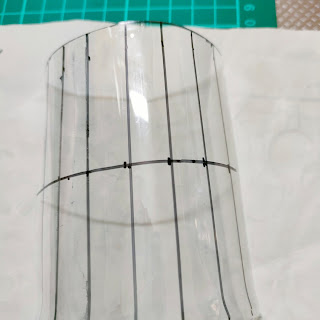
Now you’ll have two sheets like this.
The ideal size is:
Width: 1cm × Height: 3cm or 3.5cm
That size gives the best chance of making a clean, round bead!
Oh, and by the way…

little bumps visible
Even 600ml Pepsi bottles

were tricky to cut,
but still usable♪
Discovered by Sky dolphin-M-!
✨Top 5 Tips for Perfect PET Bottle Beads✨
After making tons of beads,
I found the secret to getting them
round, neat, and super pretty!
✨ Tip #1: Focus on Symmetry in Your Design!
This is one of the most important tips (^^♪
When you draw your design,
if it’s symmetrical,
the bead shrinks into a beautiful round shape in the oven.
On the flip side, if the design is not symmetrical,
it often twists or warps unexpectedly
as it shrinks with heat.
If you want a perfect round shape,
try imagining a centerline,
and design both sides evenly☆
・The one on the far left didn't turn out well because the design was unbalanced.
・When using light colors, the edges tend to curl in like a heart shape.
・Rounding the corners before baking helps prevent mistakes.
Best Size (in my opinion):
Width: 1cm × Height: 3cm
I tested lots of sizes,
and this one gave the cutest, puffiest result!
Even 1cm × 4cm
turned out nice and round,
so try that size too if you want a slightly longer shape✨
📝 When cutting out your design:
Make sure to cut on or inside the black border line.
If any black outline remains,
it can show up too bold after baking,
making the bead look messy.
So trim away all borders that aren’t part of your design☆
✨ Tip #2: Keep It Simple!
I once read a blog that said,
"Just draw something random, and it’ll work!"
But...
Simple designs actually work best!
Bold, clear colors stand out better when baked.
If the design is too busy,
the colors can blend together or turn out messy.
Start with basic lines or dots.
Uniform patterns give the cleanest results!
Bake at 170–180°C (340–355°F)
for about 1 to 1.5 minutes using a toaster oven.
Place your decorated pieces on a crumpled piece of aluminum foil before baking.
This helps prevent them from sticking or sliding around inside the toaster oven.
⚠️ Be sure to check every 30 seconds—depending on your oven, it may burn or warp faster.
👉 When the bead curls up into a round shape, it's ready!
Easy Tips for Even Baking:
-
Place the cut pieces on parchment paper
-
Make sure your designs are symmetrical
-
Preheat your oven
-
Avoid overcrowding: bake 5–6 pieces at a time
Why Did It Fail?
Let’s break down the reasons your beads might not be turning out right!
💡 Q: Why does it twist if the design isn’t symmetrical?
→ Because PET bottles shrink unevenly when heated.
If your design isn’t balanced, the shrinking force becomes uneven,
pulling the bead in different directions—
which causes unexpected twists!
💡 Q: Why do leftover black lines show up so much?
→ When permanent marker ink is heated,
it gets darker and thicker.
Any black outline left on the edge
will become too bold and noticeable,
making your bead look messy.
Cut exactly on the line or just inside it!
💡 Q: Why don’t complicated designs turn out well?
→ Again, because of the way colors compress when shrinking.
Detailed artwork or too many colors
can blend or bleed together during baking,
making your design look blurry or chaotic.
That's why simple and clean patterns
look the best after baking 💫
Final Thoughts
I’ve failed a lot—really, a lot! 😅
But that helped me figure out the tips I’m sharing now.
If you're struggling like I was,
I hope this blog helps you learn from the mistakes
and enjoy making your own special PET bottle beads 💖
Next, I’ll share how to turn your beads
into a beautiful sun catcher 🌈✨
Stay tuned if you're curious ('ω')♪


0 件のコメント:
コメントを投稿